ワークフローについて
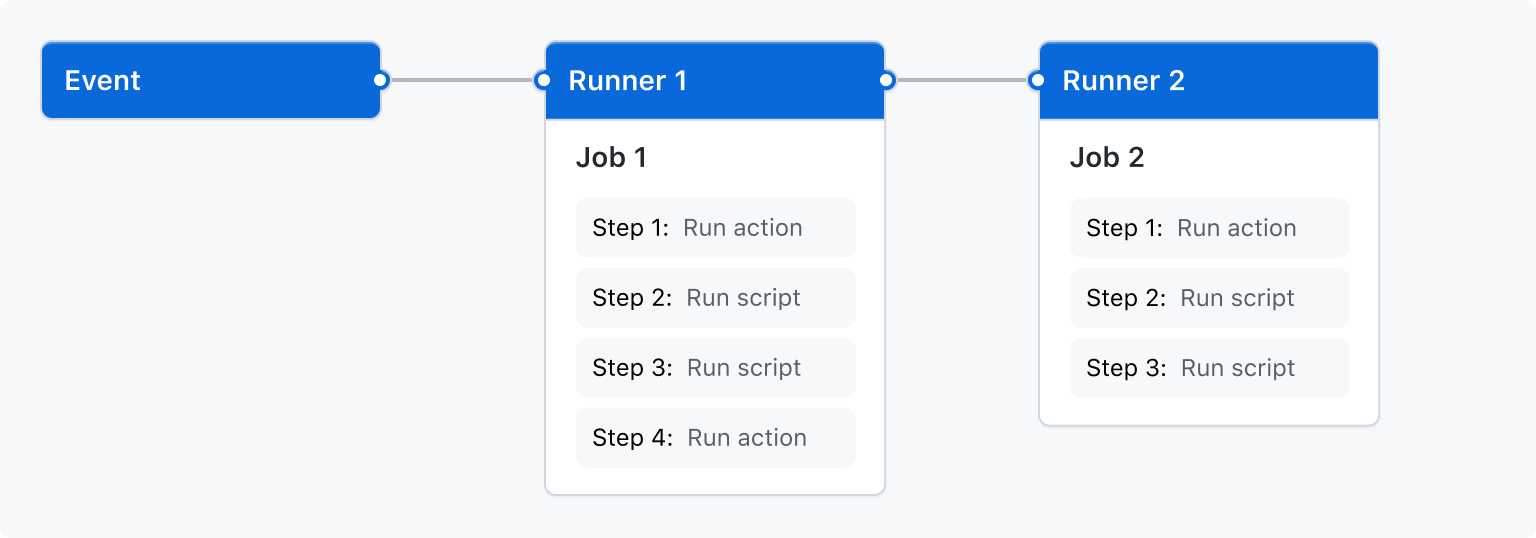
ワークフローは、1 つ以上のジョブを実行する構成可能な自動化プロセスです。 ワークフローは、リポジトリにチェックインされる YAML ファイルによって定義され、リポジトリ内のイベントによってトリガーされたときに実行されます。また、手動でトリガーしたり、定義されたスケジュールでトリガーしたりすることもできます。
ワークフローはリポジトリ内の .github/workflows ディレクトリで定義され、リポジトリには複数のワークフローを含めることができます。各ワークフローは、それぞれ異なる一連のタスクを実行できます。 たとえば、あるワークフローでは、pull request をビルドしてテストし、別のワークフローでは、リリースが作成されるたびにアプリケーションをデプロイし、さらに別のワークフローでは、新しい issue が開かれるたびにラベルを追加することができます。
ワークフローの基本
ワークフローには、次の基本的なコンポーネントが含まれている必要があります。
- ワークフローをトリガーする 1 つ以上の イベント 。
- 1 つ以上の ジョブ。それぞれが ランナー マシンで実行され、一連の 1 つ以上の _ステップ_が実行されます。
- 各ステップは、ユーザーが定義したスクリプトか、アクションを実行でき、ワークフローを簡略化できる再利用可能な拡張機能です。
これらの基本的なコンポーネントについて詳しくは、「GitHub Actions を理解する」をご覧ください。

ワークフローのトリガー
ワークフロー トリガーは、ワークフローの実行を引き起こすイベントです。 次のようなイベントがあります。
- ワークフローのリポジトリ内で発生するイベント
- GitHub Enterprise Server の外部で発生し、GitHub Enterprise Server で
repository_dispatchイベントをトリガーするイベント - スケジュールされた時刻
- マニュアル
たとえば、リポジトリの既定のブランチに対してプッシュが行われたときや、リリースが作成されたとき、またはイシューが開かれたときに実行するようにワークフローを構成できます。
詳しくは、「ワークフローのトリガー」をご覧ください。すべてのイベントの一覧については、「ワークフローをトリガーするイベント」をご覧ください。
ワークフロー構文
ワークフローは YAML を使って定義されます。 ワークフローを作るための YAML 構文の完全な説明については、「ギットハブ アクション のワークフロー構文」をご覧ください。
サンプルワークフローを作成する
GitHub Actions では、YAML 構文を使用してワークフローを定義します。 各ワークフローは、コード リポジトリ内の .github/workflows という名前のディレクトリに個別の YAML ファイルとして格納されます。
コードがプッシュされるたびに一連のコマンドを自動的にトリガーするサンプルワークフローをリポジトリに作成できます。 このワークフローでは、GitHub Actions がプッシュされたコードをチェックアウトし、bats テスト フレームワークをインストールし、bats バージョンを出力する基本コマンド bats -v を実行します。
-
自身のリポジトリで、ワークフロー ファイルを格納するための
.github/workflows/ディレクトリを作成します。 -
.github/workflows/ディレクトリで、learn-github-actions.ymlという名前の新しいファイルを作成し、次のコードを追加します。YAML name: learn-github-actions run-name: ${{ github.actor }} is learning GitHub Actions on: [push] jobs: check-bats-version: runs-on: ubuntu-latest steps: - uses: actions/checkout@v4 - uses: actions/setup-node@v4 with: node-version: '20' - run: npm install -g bats - run: bats -vname: learn-github-actions run-name: ${{ github.actor }} is learning GitHub Actions on: [push] jobs: check-bats-version: runs-on: ubuntu-latest steps: - uses: actions/checkout@v4 - uses: actions/setup-node@v4 with: node-version: '20' - run: npm install -g bats - run: bats -v -
これらの変更をコミットして、GitHub リポジトリにプッシュします。
これで、新しい GitHub Actions ワークフローファイルがリポジトリにインストールされ、別のユーザがリポジトリに変更をプッシュするたびに自動的に実行されます。 ワークフローの実行履歴に関する詳細については、「ワークフロー実行時のアクティビティを見る」を参照してください。
ワークフローファイルを理解する
YAML 構文を使用してワークフローファイルを作成する方法を理解しやすくするために、このセクションでは、導入例の各行について説明します。
# Optional - The name of the workflow as it will appear in the "Actions" tab of the GitHub repository. If this field is omitted, the name of the workflow file will be used instead.
name: learn-github-actions

# Optional - The name for workflow runs generated from the workflow, which will appear in the list of workflow runs on your repository's "Actions" tab. This example uses an expression with the `github` context to display the username of the actor that triggered the workflow run. For more information, see "[AUTOTITLE](/actions/using-workflows/workflow-syntax-for-github-actions#run-name)."
run-name: ${{ github.actor }} is learning GitHub Actions

# Specifies the trigger for this workflow. This example uses the `push` event, so a workflow run is triggered every time someone pushes a change to the repository or merges a pull request.  This is triggered by a push to every branch; for examples of syntax that runs only on pushes to specific branches, paths, or tags, see "[AUTOTITLE](/actions/reference/workflow-syntax-for-github-actions#onpushpull_requestpull_request_targetpathspaths-ignore)."
on: [push]

# Groups together all the jobs that run in the `learn-github-actions` workflow.
jobs:

# Defines a job named `check-bats-version`. The child keys will define properties of the job.
  check-bats-version:

# Configures the job to run on the latest version of an Ubuntu Linux runner. This means that the job will execute on a fresh virtual machine hosted by GitHub. For syntax examples using other runners, see "[AUTOTITLE](/actions/reference/workflow-syntax-for-github-actions#jobsjob_idruns-on)"
    runs-on: ubuntu-latest

# Groups together all the steps that run in the `check-bats-version` job. Each item nested under this section is a separate action or shell script.
    steps:

# The `uses` keyword specifies that this step will run `v4` of the `actions/checkout` action. This is an action that checks out your repository onto the runner, allowing you to run scripts or other actions against your code (such as build and test tools). You should use the checkout action any time your workflow will use the repository's code.
      - uses: actions/checkout@v4

# This step uses the `actions/setup-node@v4` action to install the specified version of the Node.js. (This example uses version 20.) This puts both the `node` and `npm` commands in your `PATH`.
      - uses: actions/setup-node@v4
        with:
          node-version: '20'

# The `run` keyword tells the job to execute a command on the runner. In this case, you are using `npm` to install the `bats` software testing package.
      - run: npm install -g bats

# Finally, you'll run the `bats` command with a parameter that outputs the software version.
      - run: bats -v
name: learn-github-actionsOptional - The name of the workflow as it will appear in the "Actions" tab of the GitHub repository. If this field is omitted, the name of the workflow file will be used instead.
run-name: ${{ github.actor }} is learning GitHub ActionsOptional - The name for workflow runs generated from the workflow, which will appear in the list of workflow runs on your repository's "Actions" tab. This example uses an expression with the github context to display the username of the actor that triggered the workflow run. For more information, see "ギットハブ アクション のワークフロー構文."
on: [push]Specifies the trigger for this workflow. This example uses the push event, so a workflow run is triggered every time someone pushes a change to the repository or merges a pull request. This is triggered by a push to every branch; for examples of syntax that runs only on pushes to specific branches, paths, or tags, see "ギットハブ アクション のワークフロー構文."
jobs:Groups together all the jobs that run in the learn-github-actions workflow.
check-bats-version:Defines a job named check-bats-version. The child keys will define properties of the job.
runs-on: ubuntu-latestConfigures the job to run on the latest version of an Ubuntu Linux runner. This means that the job will execute on a fresh virtual machine hosted by GitHub. For syntax examples using other runners, see "ギットハブ アクション のワークフロー構文"
steps:Groups together all the steps that run in the check-bats-version job. Each item nested under this section is a separate action or shell script.
- uses: actions/checkout@v4The uses keyword specifies that this step will run v4 of the actions/checkout action. This is an action that checks out your repository onto the runner, allowing you to run scripts or other actions against your code (such as build and test tools). You should use the checkout action any time your workflow will use the repository's code.
      - uses: actions/setup-node@v4
        with:
          node-version: '20'
This step uses the actions/setup-node@v4 action to install the specified version of the Node.js. (This example uses version 20.) This puts both the node and npm commands in your PATH.
- run: npm install -g batsThe run keyword tells the job to execute a command on the runner. In this case, you are using npm to install the bats software testing package.
- run: bats -vFinally, you'll run the bats command with a parameter that outputs the software version.
# Optional - The name of the workflow as it will appear in the "Actions" tab of the GitHub repository. If this field is omitted, the name of the workflow file will be used instead.
name: learn-github-actions

# Optional - The name for workflow runs generated from the workflow, which will appear in the list of workflow runs on your repository's "Actions" tab. This example uses an expression with the `github` context to display the username of the actor that triggered the workflow run. For more information, see "[AUTOTITLE](/actions/using-workflows/workflow-syntax-for-github-actions#run-name)."
run-name: ${{ github.actor }} is learning GitHub Actions

# Specifies the trigger for this workflow. This example uses the `push` event, so a workflow run is triggered every time someone pushes a change to the repository or merges a pull request.  This is triggered by a push to every branch; for examples of syntax that runs only on pushes to specific branches, paths, or tags, see "[AUTOTITLE](/actions/reference/workflow-syntax-for-github-actions#onpushpull_requestpull_request_targetpathspaths-ignore)."
on: [push]

# Groups together all the jobs that run in the `learn-github-actions` workflow.
jobs:

# Defines a job named `check-bats-version`. The child keys will define properties of the job.
  check-bats-version:

# Configures the job to run on the latest version of an Ubuntu Linux runner. This means that the job will execute on a fresh virtual machine hosted by GitHub. For syntax examples using other runners, see "[AUTOTITLE](/actions/reference/workflow-syntax-for-github-actions#jobsjob_idruns-on)"
    runs-on: ubuntu-latest

# Groups together all the steps that run in the `check-bats-version` job. Each item nested under this section is a separate action or shell script.
    steps:

# The `uses` keyword specifies that this step will run `v4` of the `actions/checkout` action. This is an action that checks out your repository onto the runner, allowing you to run scripts or other actions against your code (such as build and test tools). You should use the checkout action any time your workflow will use the repository's code.
      - uses: actions/checkout@v4

# This step uses the `actions/setup-node@v4` action to install the specified version of the Node.js. (This example uses version 20.) This puts both the `node` and `npm` commands in your `PATH`.
      - uses: actions/setup-node@v4
        with:
          node-version: '20'

# The `run` keyword tells the job to execute a command on the runner. In this case, you are using `npm` to install the `bats` software testing package.
      - run: npm install -g bats

# Finally, you'll run the `bats` command with a parameter that outputs the software version.
      - run: bats -v
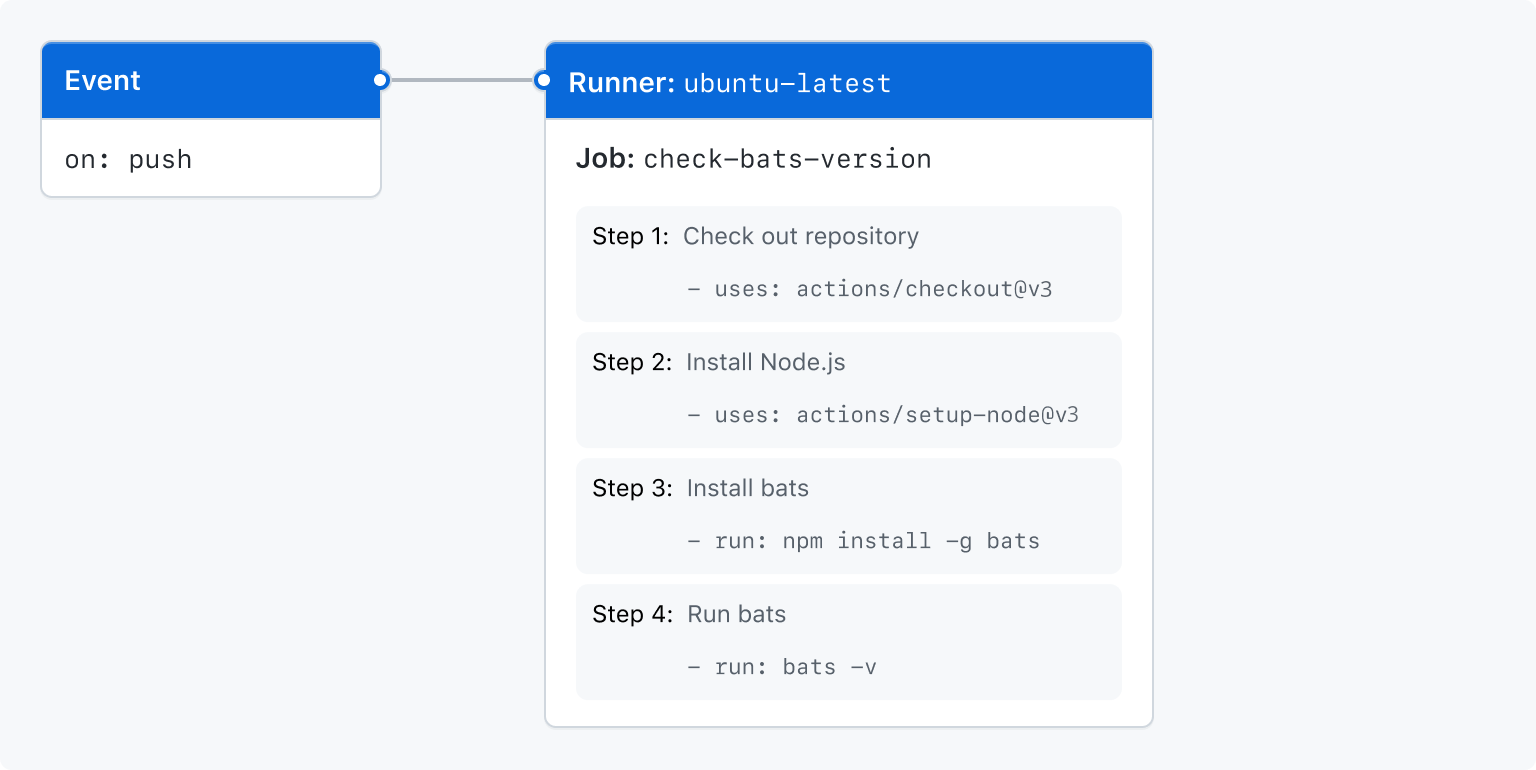
ワークフローファイルの視覚化
この図では、作成したワークフローファイルと、GitHub Actions コンポーネントが階層にどのように整理されているかを確認できます。 各ステップでは、単一のアクションまたはシェル スクリプトが実行されます。 ステップ 1 と 2 ではアクションが実行され、ステップ 3 と 4 ではシェル スクリプトが実行されます。 ワークフローの事前構築済みアクションの詳細については、「アクションの検索とカスタマイズ」を参照してください。

ワークフロー実行のアクティビティの表示
ワークフローがトリガーされると、 ワークフローを実行するワークフロー実行 が作成されます。 ワークフロー実行の開始後に、実行の進行状況を示す視覚化グラフが表示され、GitHub での各ステップのアクティビティを表示できます。
-
お使いの GitHub Enterprise Server インスタンス で、リポジトリのメイン ページへ移動します。
-
リポジトリ名の下にある [アクション] をクリックします。
!["github/docs" リポジトリのタブのスクリーンショット。 [アクション] タブがオレンジ色の枠線で強調表示されています。](https://github.github.com/docs-ghes-3.9/assets/cb-21778/images/help/repository/actions-tab.png)
-
左サイドバーで、表示するワークフローをクリックします。
![[アクション] タブの左側のサイド バーのスクリーンショット。ワークフロー "CodeQL" が濃いオレンジ色の枠線で囲まれています。](https://github.github.com/docs-ghes-3.9/assets/cb-40551/images/help/actions/superlinter-workflow-sidebar.png)
-
ワークフロー実行の一覧で実行の名前をクリックすると、ワークフロー実行の概要が表示されます。
-
左側のサイドバーまたは視覚化グラフで、表示するジョブをクリックします。
-
ステップの結果を表示するには、ステップをクリックします。
ワークフロー実行の再実行、取り消し、削除など、ワークフロー実行の管理について詳しくは、「ワークフロー実行を管理する」をご覧ください。
スターター ワークフローを使用する
GitHub には、独自の継続的インテグレーション ワークフローを作成するためにカスタマイズできる事前構成済みのスターター ワークフローが用意されています。 GitHub Enterprise Server はコードを分析し、自分のリポジトリに役立つ可能性のある CI スターター ワークフローを表示します。 たとえばリポジトリにNode.jsのコードが含まれているなら、Node.jsプロジェクトのためのサジェッションが提示されます。 スターター ワークフローは、カスタム ワークフローの構築の出発点として利用することも、そのまま利用することもできます。
スターター ワークフローの完全な一覧については、 お使いの GitHub Enterprise Server インスタンス の actions/starter-workflows を参照してください。
スターター ワークフローを使うおよび作ることについて詳しくは、「スターター ワークフローの使用」と「Organization のスターター ワークフローを作成する」をご覧ください。
高度なワークフロー機能
このセクションでは、より複雑なワークフローの作成に役立つ GitHub Actions のいくつかの高度な機能について簡単に説明します。
シークレットの保存
ワークフローでパスワードや証明書などの機密データを使用する場合は、これらを GitHub に シークレット として保存し、それらをワークフロー内で環境変数として使用できます。 つまり、機密性の高い値をワークフローの YAML ソースに直接埋め込むことなく、ワークフローを作成して共有できます。
この例のジョブでは、既存のシークレットを環境変数として参照し、それをパラメーターとしてサンプル コマンドに送信する方法を示します。
jobs:
  example-job:
    runs-on: ubuntu-latest
    steps:
      - name: Retrieve secret
        env:
          super_secret: ${{ secrets.SUPERSECRET }}
        run: |
          example-command "$super_secret"
詳しくは、「GitHub Actions でのシークレットの使用」を参照してください。
依存ジョブを作成する
デフォルトでは、ワークフロー内のジョブはすべて同時並行で実行されます。 別のジョブが完了した後でのみ実行する必要があるジョブがある場合は、needs キーワードを使ってこの依存関係を作成できます。 ジョブの 1 つが失敗すると、依存するすべてのジョブがスキップされます。ただし、ジョブを続ける必要がある場合は、if 条件ステートメントを使ってこれを定義できます。
この例では、setup、build、test ジョブが連続して実行され、build と test は、それらに先行するジョブの正常な完了に依存します。
jobs:
  setup:
    runs-on: ubuntu-latest
    steps:
      - run: ./setup_server.sh
  build:
    needs: setup
    runs-on: ubuntu-latest
    steps:
      - run: ./build_server.sh
  test:
    needs: build
    runs-on: ubuntu-latest
    steps:
      - run: ./test_server.sh
詳しくは、「ワークフローでジョブを使用する」を参照してください。
マトリックスを使用する
マトリックス戦略を使用すると、1 つのジョブ定義で変数を使用して、変数の組み合わせに基づく複数のジョブ実行を自動的に作成できます。 たとえば、マトリックス戦略を使用して、複数バージョンの言語または複数のオペレーティング システムでコードをテストできます。マトリックスは、配列としてビルド オプションを受け取る strategy キーワードを使って作成します。 たとえば、このマトリックスは、異なるバージョンの Node.js を使って、ジョブを複数回実行します。
jobs:
  build:
    runs-on: ubuntu-latest
    strategy:
      matrix:
        node: [14, 16]
    steps:
      - uses: actions/setup-node@v4
        with:
          node-version: ${{ matrix.node }}
詳しくは、「ジョブにマトリックスを使用する」を参照してください。
依存関係のキャッシング
ジョブで依存関係を定期的に再利用する場合は、これらのファイルをキャッシュしてパフォーマンスを向上させることを検討できます。 キャッシュが作成されると、同じリポジトリ内のすべてのワークフローで使用できるようになります。
この例では、~/.npm ディレクトリをキャッシュする方法を示します。
jobs:
  example-job:
    steps:
      - name: Cache node modules
        uses: actions/cache@v3
        env:
          cache-name: cache-node-modules
        with:
          path: ~/.npm
          key: ${{ runner.os }}-build-${{ env.cache-name }}-${{ hashFiles('**/package-lock.json') }}
          restore-keys: |
            ${{ runner.os }}-build-${{ env.cache-name }}-
詳しくは、「依存関係をキャッシュしてワークフローのスピードを上げる」を参照してください。
データベースとサービスコンテナの利用
ジョブにデータベースまたはキャッシュ サービスが必要な場合は、services キーワードを使って一時コンテナーを作成し、サービスをホストすることができます。作成されたコンテナーは、そのジョブ内のすべてのステップで利用でき、ジョブが完了すると削除されます。 この例では、ジョブで services を使って postgres コンテナーを作成した後、node を使ってサービスに接続する方法を示します。
jobs:
  container-job:
    runs-on: ubuntu-latest
    container: node:10.18-jessie
    services:
      postgres:
        image: postgres
    steps:
      - name: Check out repository code
        uses: actions/checkout@v4
      - name: Install dependencies
        run: npm ci
      - name: Connect to PostgreSQL
        run: node client.js
        env:
          POSTGRES_HOST: postgres
          POSTGRES_PORT: 5432
詳しくは、「コンテナー化されたサービスを使用する」を参照してください。
ラベルを使用してワークフローを転送する
特定のタイプのランナーがジョブを処理するようにしたい場合は、ラベルを使用してジョブの実行場所を制御できます。 セルフホステッド ランナーには、既定のラベル self-hosted 以外のラベルを割り当てることができます。 その後、YAML ワークフローでこれらのラベルを参照し、ジョブが予測可能な方法でルーティングされるようにすることができます。 GitHub-ホステッド ランナーには、定義済みのラベルが割り当てられます。
この例は、ワークフローがラベルを使用して必要なランナーを指定する方法を示しています。
jobs:
  example-job:
    runs-on: [self-hosted, linux, x64, gpu]
ワークフローは、runs-on 配列内のすべてのラベルを持つランナーでのみ実行されます。 ジョブは、指定されたラベルを持つアイドル状態のセルフホステッド ランナーに優先的に移動します。
セルフホステッド ランナーのラベルについて詳しくは、「セルフホストランナーとのラベルの利用」をご覧ください。
ワークフローの再利用
ワークフローを公開または非公開で自分の組織と共有するために、あるワークフローを別のワークフロー内から呼び出すことができます。 このようにすると、ワークフローを再利用し、重複を回避し、ワークフローのメンテナンスを簡単にすることができます。 詳しくは、「ワークフローの再利用」を参照してください。
ワークフローのセキュリティ強化
GitHubは、ワークフローのセキュリティを強化するために使用できるセキュリティ機能が用意されています。 GitHubのビルトイン機能を使用し、実行するアクションの脆弱性に関する通知を受け取ったり、ワークフロー内のアクションを最新の状態に保つプロセスを自動化したりできます。 詳しくは、「GitHub のセキュリティ機能を使用して GitHub Actions の使用をセキュリティで保護する」を参照してください。
環境の使用
保護ルールとシークレットを使って環境を構成し、ワークフローでのジョブの実行を制御できます。 ワークフロー中の各ジョブは、1つの環境を参照できます。 その環境を参照するジョブがランナーに送信される前に、その環境に設定された保護ルールはパスしなければなりません。 詳しくは、「デプロイに環境を使用する」を参照してください。