Introducción
En esta guía se muestra cómo crear un flujo de trabajo básico que se desencadena cuando se inserta código en el repositorio.
Para empezar a trabajar con flujos de trabajo preconfigurados, examine la lista de plantillas del repositorio actions/starter-workflows. Para más información, consulta Uso de plantillas de flujo de trabajo.
Creación de un flujo de trabajo de ejemplo
Las GitHub Actions utilizan la sintaxis de YAML para definir el flujo de trabajo. Cada flujo de trabajo se almacena como un archivo YAML independiente en el repositorio de código, en un directorio denominado .github/workflows.
Puedes crear un flujo de trabajo de ejemplo en tu repositorio que active automáticamente una serie de comandos cada que se suba código. En este flujo de trabajo GitHub Actions extrae el código insertado, instala el marco de pruebas de bats y ejecuta un comando básico para generar la versión de los bats: bats -v.
-
En el repositorio, cree el directorio
.github/workflows/para almacenar los archivos de flujo de trabajo. -
En el directorio
.github/workflows/, cree un archivo denominadolearn-github-actions.ymly agregue el código siguiente.YAML name: learn-github-actions run-name: ${{ github.actor }} is learning GitHub Actions on: [push] jobs: check-bats-version: runs-on: ubuntu-latest steps: - uses: actions/checkout@v4 - uses: actions/setup-node@v4 with: node-version: '20' - run: npm install -g bats - run: bats -vname: learn-github-actions run-name: ${{ github.actor }} is learning GitHub Actions on: [push] jobs: check-bats-version: runs-on: ubuntu-latest steps: - uses: actions/checkout@v4 - uses: actions/setup-node@v4 with: node-version: '20' - run: npm install -g bats - run: bats -v -
Confirma estos cambios y cárgalos a tu repositorio de GitHub.
Tu archivo de flujo de trabajo de GitHub Actions nuevo estará ahora instalado en tu repositorio y se ejecutará automáticamente cada que alguien suba un cambio a éste. Para ver los detalles sobre el historial de ejecución de un flujo de trabajo, consulta Visualización de la actividad de una ejecución de flujo de trabajo.
Entender el archivo de flujo de trabajo
Para ayudarte a entender cómo se utiliza la sintaxis de YAML para crear un flujo de trabajo, esta sección explica cada línea del ejemplo de la introducción:
# Optional - The name of the workflow as it will appear in the "Actions" tab of the GitHub repository. If this field is omitted, the name of the workflow file will be used instead.
name: learn-github-actions

# Optional - The name for workflow runs generated from the workflow, which will appear in the list of workflow runs on your repository's "Actions" tab. This example uses an expression with the `github` context to display the username of the actor that triggered the workflow run. For more information, see [AUTOTITLE](/actions/using-workflows/workflow-syntax-for-github-actions#run-name).
run-name: ${{ github.actor }} is learning GitHub Actions

# Specifies the trigger for this workflow. This example uses the `push` event, so a workflow run is triggered every time someone pushes a change to the repository or merges a pull request. This is triggered by a push to every branch; for examples of syntax that runs only on pushes to specific branches, paths, or tags, see [AUTOTITLE](/actions/reference/workflow-syntax-for-github-actions#onpushpull_requestpull_request_targetpathspaths-ignore).
on: [push]

# Groups together all the jobs that run in the `learn-github-actions` workflow.
jobs:

# Defines a job named `check-bats-version`. The child keys will define properties of the job.
  check-bats-version:

# Configures the job to run on the latest version of an Ubuntu Linux runner. This means that the job will execute on a fresh virtual machine hosted by GitHub. For syntax examples using other runners, see [AUTOTITLE](/actions/reference/workflow-syntax-for-github-actions#jobsjob_idruns-on)
    runs-on: ubuntu-latest

# Groups together all the steps that run in the `check-bats-version` job. Each item nested under this section is a separate action or shell script.
    steps:

# The `uses` keyword specifies that this step will run `v4` of the `actions/checkout` action. This is an action that checks out your repository onto the runner, allowing you to run scripts or other actions against your code (such as build and test tools). You should use the checkout action any time your workflow will use the repository's code.
      - uses: actions/checkout@v4

# This step uses the `actions/setup-node@v4` action to install the specified version of the Node.js. (This example uses version 20.) This puts both the `node` and `npm` commands in your `PATH`.
      - uses: actions/setup-node@v4
        with:
          node-version: '20'

# The `run` keyword tells the job to execute a command on the runner. In this case, you are using `npm` to install the `bats` software testing package.
      - run: npm install -g bats

# Finally, you'll run the `bats` command with a parameter that outputs the software version.
      - run: bats -v
name: learn-github-actionsOptional - The name of the workflow as it will appear in the "Actions" tab of the GitHub repository. If this field is omitted, the name of the workflow file will be used instead.
run-name: ${{ github.actor }} is learning GitHub ActionsOptional - The name for workflow runs generated from the workflow, which will appear in the list of workflow runs on your repository's "Actions" tab. This example uses an expression with the github context to display the username of the actor that triggered the workflow run. For more information, see Sintaxis del flujo de trabajo para GitHub Actions.
on: [push]Specifies the trigger for this workflow. This example uses the push event, so a workflow run is triggered every time someone pushes a change to the repository or merges a pull request. This is triggered by a push to every branch; for examples of syntax that runs only on pushes to specific branches, paths, or tags, see Sintaxis del flujo de trabajo para GitHub Actions.
jobs:Groups together all the jobs that run in the learn-github-actions workflow.
check-bats-version:Defines a job named check-bats-version. The child keys will define properties of the job.
runs-on: ubuntu-latestConfigures the job to run on the latest version of an Ubuntu Linux runner. This means that the job will execute on a fresh virtual machine hosted by GitHub. For syntax examples using other runners, see Sintaxis del flujo de trabajo para GitHub Actions
steps:Groups together all the steps that run in the check-bats-version job. Each item nested under this section is a separate action or shell script.
- uses: actions/checkout@v4The uses keyword specifies that this step will run v4 of the actions/checkout action. This is an action that checks out your repository onto the runner, allowing you to run scripts or other actions against your code (such as build and test tools). You should use the checkout action any time your workflow will use the repository's code.
      - uses: actions/setup-node@v4
        with:
          node-version: '20'
This step uses the actions/setup-node@v4 action to install the specified version of the Node.js. (This example uses version 20.) This puts both the node and npm commands in your PATH.
- run: npm install -g batsThe run keyword tells the job to execute a command on the runner. In this case, you are using npm to install the bats software testing package.
- run: bats -vFinally, you'll run the bats command with a parameter that outputs the software version.
# Optional - The name of the workflow as it will appear in the "Actions" tab of the GitHub repository. If this field is omitted, the name of the workflow file will be used instead.
name: learn-github-actions

# Optional - The name for workflow runs generated from the workflow, which will appear in the list of workflow runs on your repository's "Actions" tab. This example uses an expression with the `github` context to display the username of the actor that triggered the workflow run. For more information, see [AUTOTITLE](/actions/using-workflows/workflow-syntax-for-github-actions#run-name).
run-name: ${{ github.actor }} is learning GitHub Actions

# Specifies the trigger for this workflow. This example uses the `push` event, so a workflow run is triggered every time someone pushes a change to the repository or merges a pull request. This is triggered by a push to every branch; for examples of syntax that runs only on pushes to specific branches, paths, or tags, see [AUTOTITLE](/actions/reference/workflow-syntax-for-github-actions#onpushpull_requestpull_request_targetpathspaths-ignore).
on: [push]

# Groups together all the jobs that run in the `learn-github-actions` workflow.
jobs:

# Defines a job named `check-bats-version`. The child keys will define properties of the job.
  check-bats-version:

# Configures the job to run on the latest version of an Ubuntu Linux runner. This means that the job will execute on a fresh virtual machine hosted by GitHub. For syntax examples using other runners, see [AUTOTITLE](/actions/reference/workflow-syntax-for-github-actions#jobsjob_idruns-on)
    runs-on: ubuntu-latest

# Groups together all the steps that run in the `check-bats-version` job. Each item nested under this section is a separate action or shell script.
    steps:

# The `uses` keyword specifies that this step will run `v4` of the `actions/checkout` action. This is an action that checks out your repository onto the runner, allowing you to run scripts or other actions against your code (such as build and test tools). You should use the checkout action any time your workflow will use the repository's code.
      - uses: actions/checkout@v4

# This step uses the `actions/setup-node@v4` action to install the specified version of the Node.js. (This example uses version 20.) This puts both the `node` and `npm` commands in your `PATH`.
      - uses: actions/setup-node@v4
        with:
          node-version: '20'

# The `run` keyword tells the job to execute a command on the runner. In this case, you are using `npm` to install the `bats` software testing package.
      - run: npm install -g bats

# Finally, you'll run the `bats` command with a parameter that outputs the software version.
      - run: bats -v
Visualizar el archivo de flujo de trabajo
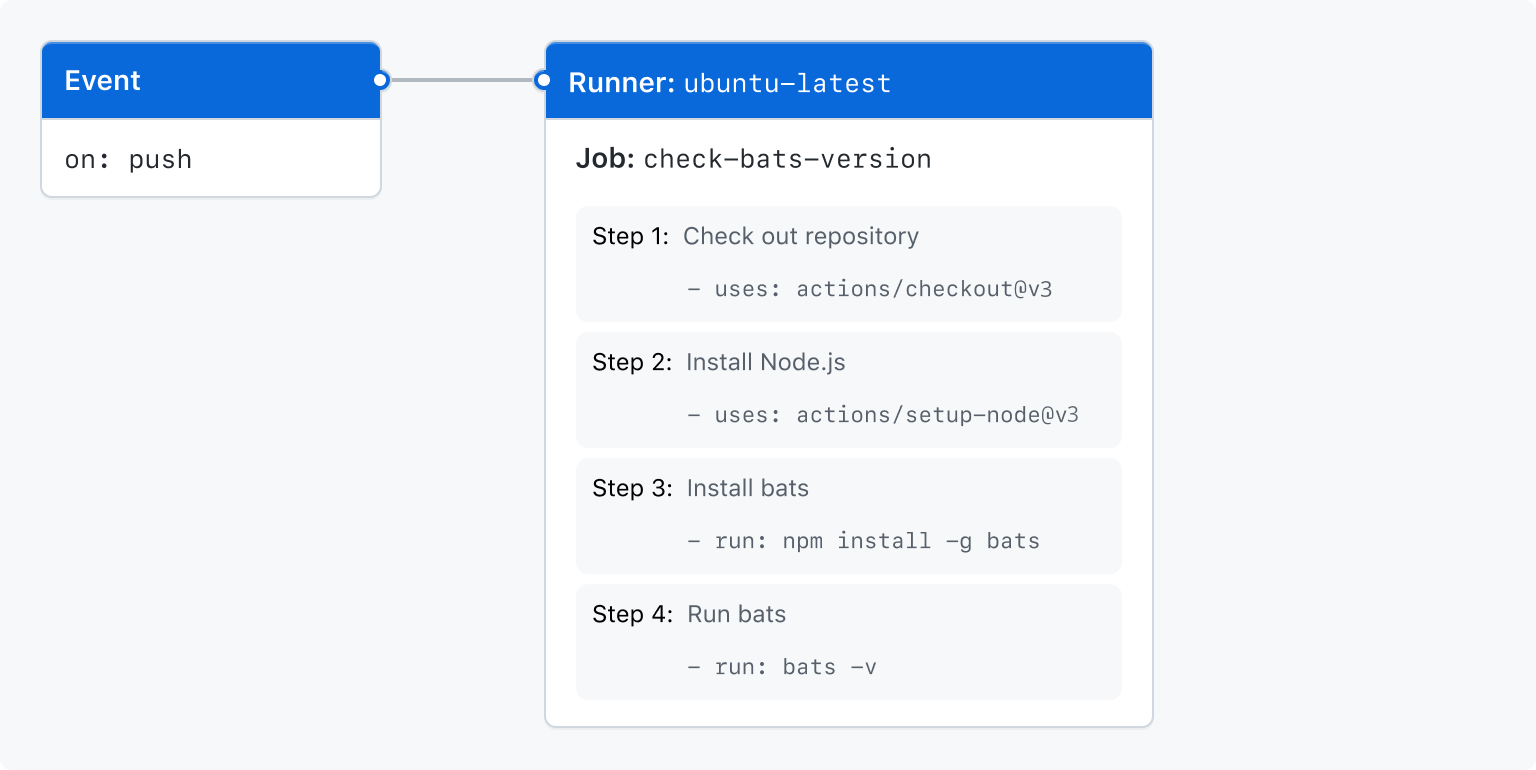
En este diagrama, puedes ver el archivo de flujo de trabajo que acabas de crear, así como la forma en que los componentes de GitHub Actions se organizan en una jerarquía. Cada paso ejecuta una acción o script de shell simples. Los pasos 1 y 2 ejecutan acciones, mientras que los pasos 3 y 4 ejecutan scripts de shell. Para encontrar más acciones precompiladas para los flujos de trabajo, consulta Uso de bloques de creación escritos previamente en el flujo de trabajo.

Visualización de la actividad de una ejecución de flujo de trabajo
Cuando se desencadena el flujo de trabajo, se crea una ejecución de flujo de trabajo que ejecuta el flujo de trabajo. Una vez que el flujo de trabajo haya comenzado a ejecutarse, puedes ver una gráfica de visualización del progreso de dicha ejecución, así como la actividad de cada paso, en GitHub.
-
En GitHub, navegue hasta la página principal del repositorio.
-
En el nombre del repositorio, haz clic en Acciones.

-
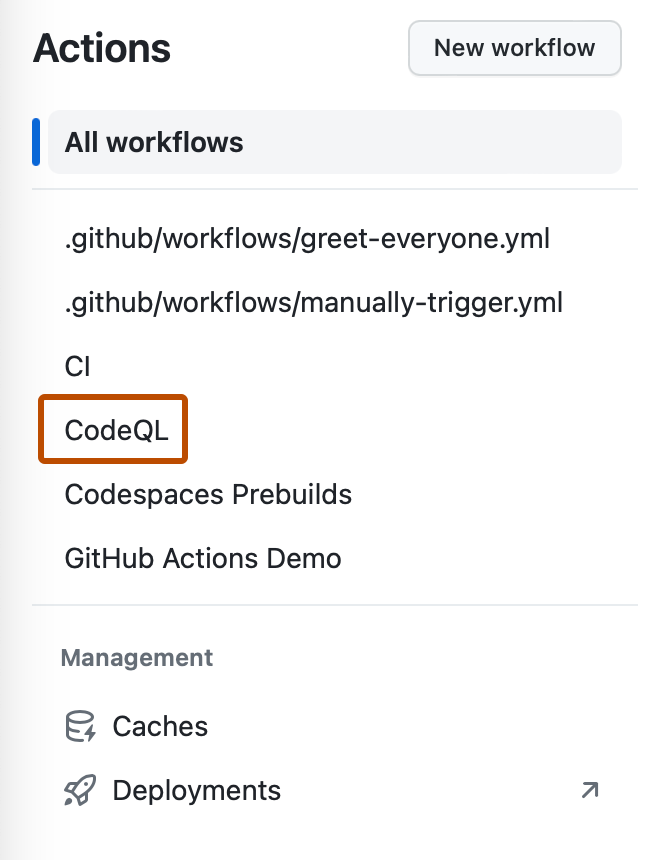
En la barra lateral izquierda, da clic en el flujo de trabajo que quieras ver.

-
En la lista de ejecuciones de flujo de trabajo, haz clic en el nombre de la ejecución para ver el resumen de la ejecución de flujo de trabajo.
-
En la barra lateral izquierda o en el gráfico de visualización, haz clic en el trabajo que quieres ver.
-
Para ver los resultados de un paso, haz clic en él.